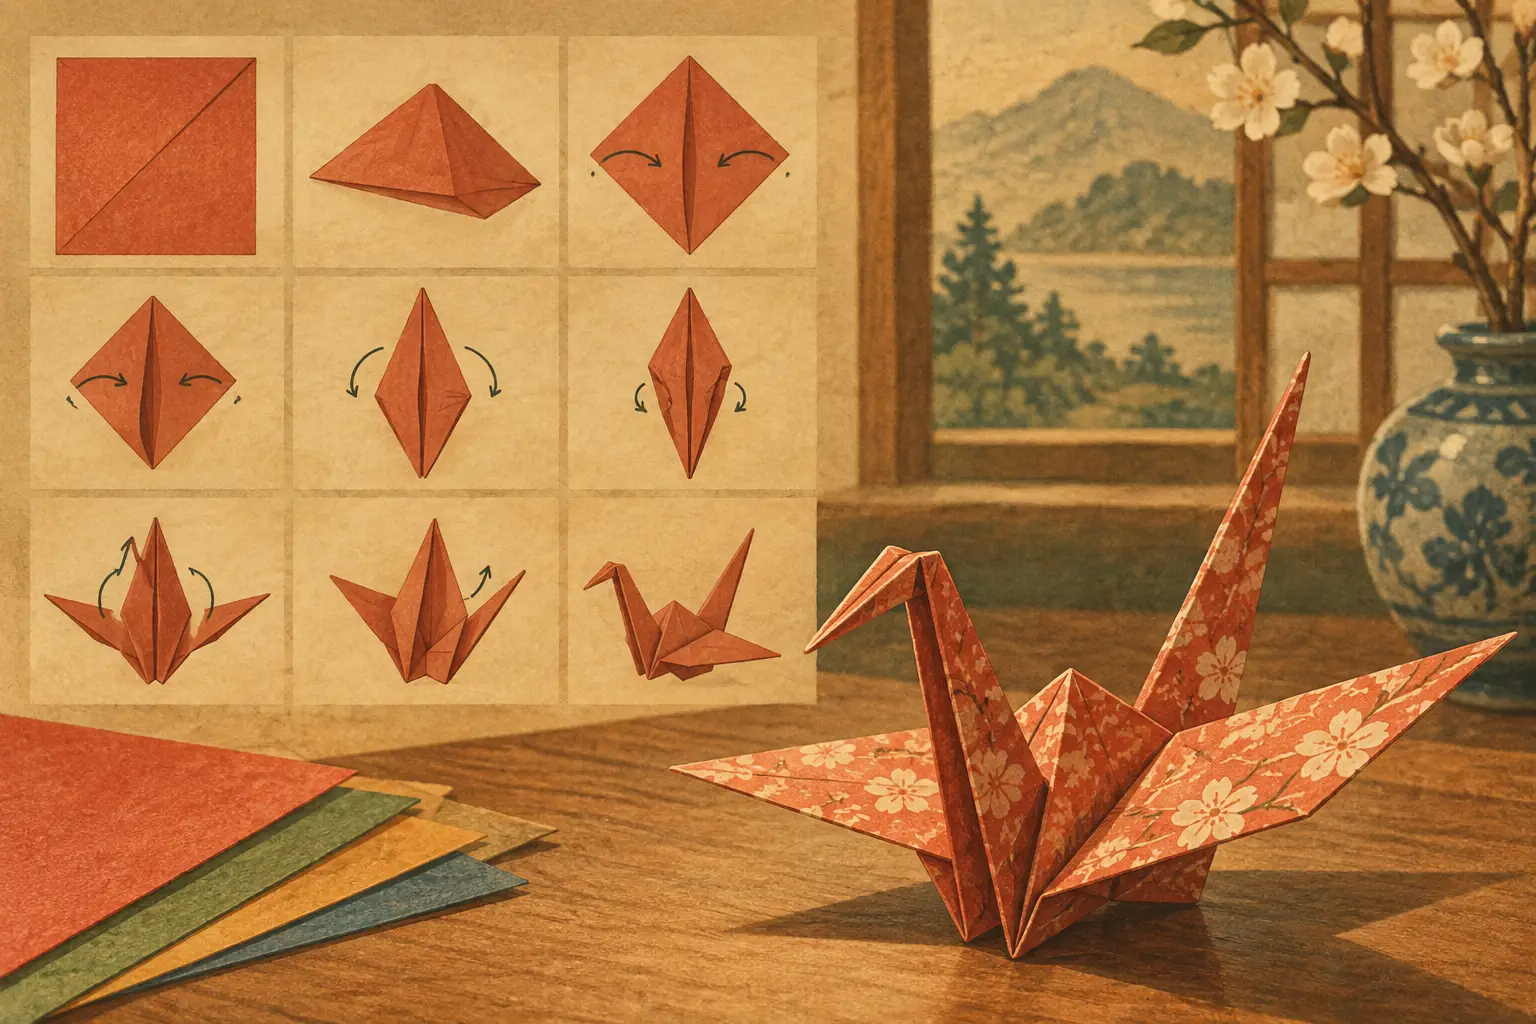
A single square of paper can become a tsuru, the Japanese crane, with no cutting, glue, or special tools. That is the quiet thrill of origami crane folding: your hands make a flat sheet feel alive through a sequence of careful choices. For Japan lovers worldwide, it is also a small way to bring a traditional craft into an ordinary afternoon.
The crane is not a project to rush. Crisp creases matter more than speed, and a slightly imperfect first bird still carries the charm of something made by hand. That gentle acceptance of imperfection has a little wabi sabi in it.
Why the paper crane means so much in Japan
In Japan, cranes are associated with long life, good fortune, fidelity, and hope. They appear in textiles, ceramics, paintings, and celebrations because the bird has long been admired for its elegance and grace. Folding one is enjoyable on its own, but knowing this background gives the finished shape more presence.
You may also hear about senbazuru, a thousand folded cranes strung together. Traditionally, a senbazuru may be given to express wishes for health, recovery, longevity, or a meaningful new beginning. The paper crane became widely recognized internationally as a symbol of peace through the story of Sadako Sasaki, a Hiroshima child who folded cranes while ill after the atomic bombing. Her story matters, but it is only one chapter in a much older tradition.
That mix of beauty, wish-making, memory, and patience is why a crane can feel like more than paper. It is a small object, yet it invites a moment of mono no aware: an awareness that fleeting things can still be deeply moving.
What to use before you start origami crane folding
Start with one square sheet of paper. Standard 6-by-6-inch origami paper, called kami, is ideal for a first crane because it is thin enough to fold repeatedly without becoming bulky. A sheet with one colored side and one white side makes the instructions easier to follow, although double-sided paper creates a lovely result too.
Avoid thick cardstock, heavily textured craft paper, or paper that tears easily. Gift wrap can work if it is light and cut perfectly square. If you cut your own paper, check the corners carefully. A nearly square sheet can make the final crane lean or refuse to close neatly.
Choose a pattern with care. Bold ukiyo-e-inspired waves, sakura blossoms, or traditional seigaiha wave motifs can look fantastic, but very busy prints may hide your crease lines while you work. For your first attempt, a plain color lets you see exactly what each fold is doing.
How to fold an origami crane
Set yourself up on a firm table with good light. Use your fingernail or the edge of a ruler to sharpen creases, but do not press so hard that you weaken the paper. Read each step once before making the fold. This saves the frustrating moment when one flap is suddenly going in the wrong direction.
Make the square base
Place the paper colored side down. Fold it diagonally from one corner to the opposite corner, then unfold it. Fold along the other diagonal and unfold again. You should see an X across the white side.
Turn the paper over so the colored side faces up. Fold it in half horizontally, unfold, then fold it in half vertically and unfold. You now have four straight creases crossing at the center.
Bring the left and right sides inward while guiding the top edge down toward the bottom edge. The existing creases will collapse naturally into a smaller square with four loose flaps at the bottom. Flatten it carefully. This shape is called the square base, and getting it tidy makes every later step easier.
Turn the square base into a bird base
Position the square base so its closed point is at the top and the open flaps are at the bottom. On the top layer only, fold the left and right outer edges into the vertical center line. It will resemble a narrow kite. Crease firmly.
Fold the small top triangle downward over those two folds, crease it, then open everything you just folded. These crease lines are guides for the next move.
Lift the bottom point of the top layer and bring it upward toward the top point. As you do, press the side edges inward along the guide creases. The paper will form a long diamond shape. Flatten it. This is a petal fold, and it may take two or three tries the first time.
Turn the model over and repeat the same sequence on the other side: fold both side edges to the center, fold down the top triangle, reopen the folds, then lift the bottom point and collapse it into another long diamond. You now have the bird base, with two long split points at the bottom.
Shape the crane’s body, wings, head, and tail
Keep the split points facing down. On the top layer, fold the left and right lower edges into the center line. Turn the model over and repeat. The shape should become slimmer, with two narrow points below.
Take one of those lower points and fold it upward toward the top, using the center line as your guide. Open it slightly, then reverse the crease inside the model so the point rises neatly. This is an inside reverse fold. Repeat with the other lower point. One will become the neck and head; the other is the tail.
Choose the point you want for the head. Near its tip, make a small fold downward, then reverse that fold inside to create a tiny beak. Do not make the head too large. A subtle bend looks more crane-like.
Finally, fold the wide side flaps downward to make the wings. Gently pull the wings apart and press the body just below them to give the crane a little volume. Your bird should stand, or at least hover gracefully between your fingers.
The places beginners usually get stuck
The petal fold is the most common trouble spot. If the paper bunches up, do not force it. Unfold back to the kite shape, reinforce the three guide creases, and try again while lifting the lower point slowly. Origami responds better to patience than pressure.
Uneven wings usually begin with an uneven square base. If your crane looks twisted, compare the center creases and check whether the two lower points were folded to the same height. A small difference early on becomes obvious at the end.
Paper choice also changes the experience. Thin kami is forgiving, while foil paper holds dramatic shapes but shows every accidental crease. Handmade washi can be beautiful for a display crane, though its fibers sometimes make sharp reverse folds harder. There is no single best paper – it depends on whether you want an easy practice session, a gift, or a decorative piece.
Give your crane a purpose
A first crane can become a bookmark decoration, a place-setting detail, a note tucked into a gift, or a simple piece of shelf art. Fold a few in related colors and hang them from thread near a window, where they can turn gently in the air. If you are making a group of cranes, use the same size paper so they feel visually connected.
For a more personal ritual, write a short wish on the white side of the paper before folding. Keep it brief, since ink can show through thin paper. The message disappears into the form as you work, becoming part of the crane rather than something displayed for everyone else.
Do not wait until your folds are perfect to make one for somebody. A handmade crane carries the time you gave it, the attention in its creases, and a warm little piece of Japan that is ready to travel from your hands to theirs.